When preparing your files for offset printing at Gandy Printers, it’s essential to keep specific guidelines in mind to ensure a smooth and successful printing process.
By understanding the requirements and best practices for file preparation, you can avoid common pitfalls and ensure that your final product meets your expectations.
First, remember that offset printing demands high-quality images, usually at a minimum of 300 dpi, to ensure your pictures are reproduced accurately.
Remember that the resolution will decrease proportionally when enlarging an image using software, so you might need to start with an even higher-resolution image.
For black-and-white line drawings and graphics, it’s best to use a resolution close to 1000 dpi for optimal results.
At Gandy Printers, we encourage you to consult with us during your design process, discussing your project and seeking our guidance on file formats and print specifications.
Working together in this way can save both time and money.
By adhering to these crucial file preparation tips, you’ll be on the right path to achieving a professional, high-quality outcome for your offset printing project.
File Formats
In preparing your files for offset printing, it is important to consider the appropriate file formats to ensure the best possible print outcome.
1. Raster vs. Vector
Raster images, such as photographs, are made of pixels, while vector graphics are created using mathematical formulas consisting of lines and shapes.
Rasters can lose quality when enlarged, making them less suitable than vector graphics for offset printing, especially regarding logos and text elements.

However, when using images in your design, ensure they have a resolution of at least 300 dpi. If you need to enlarge an image, the resolution will drop accordingly.
For monochrome bitmap line drawings and graphics, a minimum resolution of 1000 dpi is required for accurate reproduction.
2. Preferred Formats
When submitting your files for printing, the preferred file format is a print-ready PDF with fonts and images embedded, using CMYK color space, and with .125″ bleed and crop marks.
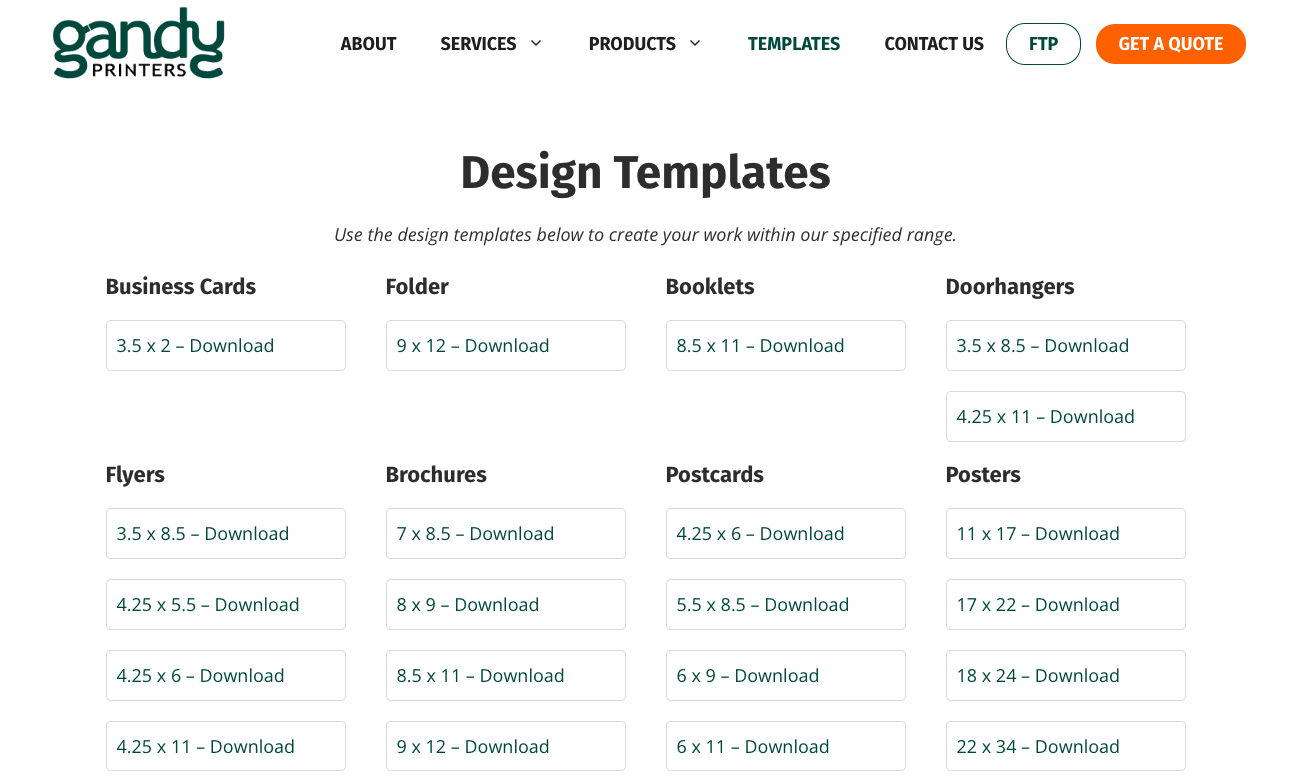
In addition, we have our databases of blank templates for you to use.

This ensures the file is compatible with most printing equipment and retains its quality during printing.
Other acceptable file formats, in order of preference, include:
- Adobe InDesign files packaged with links and fonts
- Adobe Illustrator (AI) files
- Encapsulated PostScript (EPS) files
- Photoshop (PSD) files
- Tagged Image File Format (TIFF) files
Be aware that some file types, such as EPS and PSD, require specific software to be opened by the printer. Therefore, it is best to consult with us before providing these formats.
Remember to provide all necessary links and fonts and ensure they are compatible with the printer’s requirements.
Following these guidelines will provide the optimal file formats for your offset printing project.
Document Setup
Bleed and Safe Area
To ensure your design is printed correctly and trimmed, set up your file with an extra 0.125″ of artwork around the edges, known as the bleed area. This buffer helps to prevent unwanted white borders or partially cut-off artwork.
Additionally, it’s important to keep critical text and important graphics at least 0.125″ away from the edge of the page, inside the “safe area.”
Crop Marks
Include crop marks in your file to indicate where the printer should trim your final piece. These marks help guide the printer in accurately aligning and cutting your design.
When exporting your file as a print-ready PDF, ensure that crop marks are included.
Resolution
For a high-quality print, ensure your images and graphics have a resolution of at least 300 dpi (dots per inch).

Lower-resolution images may result in a blurry or pixelated final product.
Check your image resolution before placing them into your design to maintain the quality of your printed piece.
Color Space
When preparing your file for offset printing, use the CMYK color space instead of RGB. CMYK refers to the four-color process used in offset printing: cyan, magenta, yellow, and key (black).
Converting your file to CMYK helps ensure that the colors in your design are accurately reproduced during printing.
Typography
Typography plays a vital role in preparing files for offset printing. Properly managing typography ensures legibility, professional appearance, and successful printing.
Font Embedding
When preparing your files, embed all fonts into the document. This allows for consistent typography across different computers and printing equipment.
Not embedding fonts might result in unexpected font substitution or errors during the print process. Create a print-ready PDF with fonts and images embedded to ensure proper font embedding.
Remember to use CMYK color space as well.
Line Spacing
Line spacing, also known as leading, plays a significant role in the readability of your printed materials.
Use adequate line spacing to avoid overcrowding text and ensure a proper balance between text and white space. The leading should generally be 120% to 145% of the font size.
Experiment with different leading values to find the best balance for your specific design.
Kerning
Kerning refers to the space between individual characters in a word. Proper kerning ensures that your text is visually appealing and easy to read.
In your design program, adjust the kerning settings so that the spacing between letters is consistent and visually balanced. Be particularly mindful of kerning when dealing with large titles or headlines, as improper kerning can result in a less professional appearance.
By paying attention to font embedding, line spacing, and kerning, you can optimize your files for offset printing and ensure a professional appearance in your printed materials.
Always double-check these aspects before submitting your files to the printer.
Image Optimization
Image optimization is a crucial step in preparing your files for offset printing. Properly optimized images ensure sharp, clear, and accurate prints.
In this section, we will cover the important aspects of image optimization, including resolution and quality, as well as color correction and enhancement.
Resolution and Quality
One of the most important factors in image optimization is the resolution of your images. A higher resolution ensures better print quality.
For offset printing, your images should have a resolution of at least 300 dpi when reproducing at 100% in the software.
Remember, if you enlarge the image, the proportional resolution will decrease.
If you’re working with graphics created in vector format, resolution is not an issue since they can be scaled without losing quality.
Ensure your images are of suitable quality by checking the resolution settings in your image editing software.
If your images have a lower resolution than 300 dpi, they may appear pixelated or blurry when printed, thus compromising the overall quality of your final product.
Color Correction and Enhancement
Another essential aspect of image optimization for offset printing is color correction and enhancement. This ensures that the colors in your images will be accurately reproduced in the printed material.

Begin by converting your images to the CMYK color mode, as this is the standard format for commercial printing.
Avoid using RGB mode, as it is primarily used for screen display and can result in color shifts when converted to CMYK during printing, as mentioned in the Adobe Help Center.
Next, adjust your image’s color balance, contrast, and brightness to enhance its appearance. You can do this using the color correction tools provided by your image editing software.
Be mindful not to over-correct or over-enhance your images, as this can lead to a loss of detail and make them look unnatural.
By optimizing your images’ resolution and color, you’ll be better prepared for a successful and professional-looking offset printing project.
Proofing
Proofing is a crucial step in ensuring the accuracy and quality of your offset printing project. This process helps you catch errors, check colors, and ensure the final product meets your expectations.
There are two main types of proofing: Soft proofing and Hard proofing.
Soft Proofing
Soft proofing is the process of checking your design on a computer screen. Before sending your files to the printer, you should review your artwork carefully on your monitor.

Make sure your images are at least 300 dpi and that your color settings are in CMYK mode.
Some tips for effective soft proofing include:
- Using a calibrated monitor to ensure accurate color representation
- Checking for font issues, missing elements, and alignment errors
- Consulting with your printer about any specific requirements or recommendations
Hard Proofing
Hard proofing involves creating a physical sample of your printed material. This is particularly important for projects where color accuracy is vital.
A hard proof allows you to see how your design will appear in print, making it easier to spot any issues that may not be apparent on a computer screen.
When requesting hard proof, consider the following:
- We offer two types of hard proofs, Xerox and Epson. Epsons are more expensive but also the most color accurate.
- Allow sufficient time (at least 24 hours) for the proofing process and any necessary revisions.
- Let us know about any specific concerns or expectations you may have.
By following these guidelines, you can ensure the success of your offset printing project through careful proofing and attention to detail.
File Submission
When preparing your files for offset printing, submitting them in the appropriate format is essential to ensure optimal results.
File Compression
Before sending your files, it’s a good idea to compress them to reduce their size and make the upload process faster. There are several compression methods available, such as:
- ZIP: A common file compression format that works well for most file types.
- RAR: Offers better compression rates but requires special software to extract the files.
Use a suitable compression method that is compatible with your printer’s requirements. Remember to ensure that the compressed files maintain their original quality.
File Transfer Methods
There are various ways to send your files to the printer. Some popular methods include:
| TransferMethod | Description |
|---|---|
| Email attachment | You can use the FTP link in the upper righthand corner of our homepage at gandyprinters.com to transfer your files if they are too big to email. |
| File transfer service | Services like WeTransfer or Dropbox allow you to quickly upload and share large files. |
| FTP | You can use the FTP link in the upper right-hand corner of our homepage at gandyprinters.com to transfer your files if they are too big to email. |
Choose a file transfer method that best suits your needs. Then, follow our guidelines for submitting artwork files, such as working in CMYK, using the right resolution, and adding bleed and safe zones to your design.
Once you have selected the appropriate compression and file transfer methods, send your files to us and provide any necessary instructions or details about your project.
If you need help with anything, you can call our office at 850-222-5847 or email us at [email protected].


